Containerisation using Docker !
July 30, 2019
Before actually moving onto the actual topic of the blog, I will summarize first, what all other things I did today, along with learning "Docker Containerisation".
- I started learning Ansible (though a terrible start).
- Learnt "What is Docker" and how to build custom docker images. Meanwhile created multiple docker containers based on these (test) images.
- Also started using tmux, a terminal-multiplexer.
- I started with "File Systems" in the Unix fundamentals 101 section of Ops School Curriculum.
I am listing below some of the articles which I read while prepping for these. I wish if you could please read these articles (or any other similar ones) before following up with me. :)
- Anatomy of Docker. (a must read)
- How To Install and Use Docker on Ubuntu 18.04.
- How to build a docker container from scratch (Docker basics — a must know).
- How To Remove Docker Containers, Images, Volumes, and Networks. (I needed it most frequently, so maybe it is here for me 😛)
And yes, now we can confidently start with our use-case of the day i.e.
I wanted to run 4 separate virtual machines for starting working on this Ansible project. These 4 virtual machines (VMs), were respectively meant to be configured as the following components.
- Control Node (control)
- Load Balancer (lb01)
- Web Server 1 and Server 2 (app01 & app02)
There could be 2 solutions to get these components up.
- Create 4 solo VM instances like I usually do on Google Cloud Platform (GCP). (or you can do on any other cloud service provider like AWS, Azure etc or inside a virtual box.)
- Create 4 VM (containers) using a containerisation tool like Docker or Vagrant.
And I chose option 2. The reason being the 4 VM containers built in Docker, are very light in every aspect when compared to solo VMs running anywhere else (as I mentioned above). Actually the latter one is highly resource intensive and imagine what if you have to create 10 or 100 or 1000s of VMs. Atleast, I can't afford running even 10 VMs at the same time (And I am sure, you also can't afford running 100 VMs at the same time with equal amount of resources allocated to each one of them). So, in that case, unanimously Docker is the winner.
By Docker, I want to refer to *any* containerisation tool here.
Now, as you all how know why I chose Docker for today. It's time to walk you through the steps required to create the setup.
[Note:- I wanted my all 4 VMs to be Ubuntu 18.04 containers. Therefore the following commands are my requirements specific.]
- First install Docker using the above linked article (I don't feel I can make the installation process any better than theirs).
- Make a directory as sudo user (let's call it testApp here) and touch a file named "Dockerfile" inside the newly created directory. This "Dockerfile" will be used for building the Docker containers.
$ sudo mkdir testApp
$ cd testApp/
$ sudo vim Dockerfile- Paste the following content in the "Dockerfile" file.
FROM ubuntu:18.04

MAINTAINER Priyanka <work@priyankasggu119.tk>

RUN apt-get update && apt dist-upgrade
RUN apt-get update && \
     apt-get install -y net-tools
QUICK NOTES:
- "FROM" is the most important part of Dockerfiles. It defines which base image will be used to initiate the build process.
- "MAINTAINER" command declares the author of the image.
- "RUN" are the actual commands that builds the application (the required docker image).
- Now run the following command to build an image using the "Dockerfile" at current location.
// Synatx:- docker build -t [image_name] .
// [image_name] should be strictly in lowercase letters.

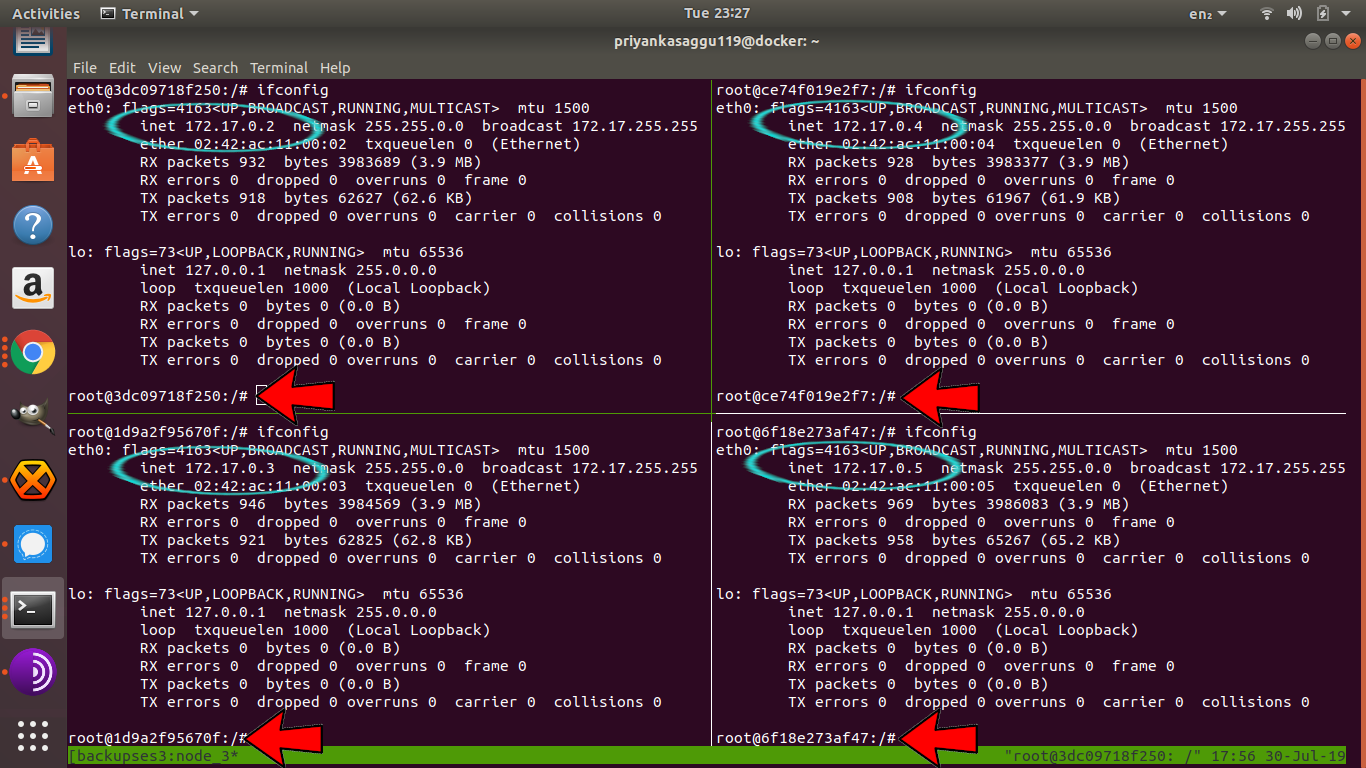
$ docker build -t testimage .- After your "testimage" build is successfully done. The final step is to create 4 VMs via running the following docker run command 4 consecutive times in 4 different terminal sessions. (This is the reason why I learnt tmux today. I wanted to run all my VMs in a single window of a tmux session, so that I can detach and attach the session as and when required. But the VM's will keep on running in the tmux session itself.)
$ docker run -ti testimage bash- This docker run command will create four Ubuntu 18.04 containers when executed four times. Each of these containers will have their unique reference IDs and each of these will be running in their own separate namespace with their own file system changes.
- If you try running "ifconfig" in all these 4 containers, you will find that all of these 4 containers have different eth0 inet address.

And, here I finish with my final goal of the day i.e. having multiple light virtual machines running at the same time.
Yay! :D